Monday, March 21, 2022

Converting Ami Pro .SAM files to .doc or .txt

Ami Pro was by far the best word processor of it's time. That was the time of Windows 3.1, and later Windows 95. It was bought by Lotus, and instead of being developed into the word processor I wish I would have now, it eventually disappeared... 

Nowadays, there is no easy way to get to the content of these old .sam files. The files are just plain ASCII text (except when they have embedded bitmap images). But extracting the raw text from the files is not simple. For example, all accented characters are written in a strange format: "é" is written as "<\i>" in the file, "à" as "<\`>", etc.

After trying various solutions like installing Windows NT 4 into a virtual machine, or directly installing Lotus Ami Pro 3.1 into an old Windows XP VM, I came across mentions of a plugin for Microsoft Word that would allow it to read .sam files. That plugin itself was hard to find. It seems to have been included in old Microsoft converter packs which are not available anymore. This blog post from 2011 explains how to install the "Ami Pro" plugin from http://www.gmayor.com/downloads.htm but unfortunately the download is not available there anymore, saying "Sadly this old filter no longer appears to work".

Eventually, I could find it at http://www.lotusamipro.com/ where it can still be downloaded : http://www.lotusamipro.com/files/word2ami.zip

And it does work in MS Word 2003, which I had in an old Windows XP virtual machine.

So, if you have Word 2003,

  • Get that file from http://www.lotusamipro.com/files/word2ami.zip (or from here)
  • Copy "Ami332.cnv"
    to "C:\Program Files\Common Files\Microsoft Shared\TextConv\Ami332.cnv"
  • Open Word, and in the File / Open... window, under "Files of type:" select "Ami Pro 3.o (*.sam)" (or "All Files (*.*)")
    You will get this warning on which you will have to click "Yes":
    This file needs to be opened by the Ami Pro 3.0 text converter, which may pose a security risk if the file you are opening is a malicious file. Choose Yes to open this file only if you are sure it is from a trusted source.

If you have many files to convert, you can map macros to buttons in Word to make it easier. Here are 2 macros in that ancient VBS language which Word understands, to save the current file as ".doc" and as ".txt":

Sub SaveAsDOC()
' Save current document as .txt
    strDocName = ActiveDocument.Name
    strPath = ActiveDocument.Path & "\"
    intPos = InStrRev(strDocName, ".")
    strDocName = Left(strDocName, intPos - 1)
    strDocName = strPath & strDocName & ".doc"

    ActiveDocument.SaveAs _
        FileFormat:=wdFormatDocument, _
        FileName:=strDocName, _
        AddToRecentFiles:=True
End Sub

Sub SaveAsTXT()
' Save current document as .txt

    strDocName = ActiveDocument.Name
    strPath = ActiveDocument.Path & "\"
    intPos = InStrRev(strDocName, ".")
    strDocName = Left(strDocName, intPos - 1)
    strDocName = strPath & strDocName & ".txt"

    ActiveDocument.SaveAs _
        FileFormat:=wdFormatText, _
        FileName:=strDocName, _
        AddToRecentFiles:=True, _
        Encoding:=1252, _
        LineEnding:=wdCRLF
End Sub

If you are on Mac or Linux or have WSL installed in Windows, you may also want to use Bash to convert the .txt files from their Windows CP 1252 character set to UTF-8:

for f in *.txt; do recode cp1252/..utf8/ "$f"; done # using recode

Or if you don't have recode but have iconv:

for f in *.txt; do iconv -f cp1252 -t utf8 -o "$f.tmp" "$f" && mv -f "$f.tmp" "$f"; done

To set the modification time of the new files to the time of the originals, the touch command can be used in Bash :

for f in *.SAM; do touch -c -r "$f" "${f%%.SAM}.txt"; done  # date of .SAM file to .txt file
for f in *.SAM; do touch -c -r "$f" "${f%%.SAM}.doc"; done  # date of .SAM file to .doc file
# or for both .txt and .doc files a once;
for f in *.SAM; do touch -c -r "$f" "${f%%.SAM}.txt" "${f%%.SAM}.doc"; done

The Word converter does not import bitmap images embedded in the Ami Pro file. These can be extracted with te following perl script:

#!/usr/bin/env perl

## Extract bitmaps embedded in file (like in Ami Pro .SAM files)

use strict;

my $debug = 1;

my $file = shift;
die "Usage: $0 FILENAME\n" unless (-r $file);

open my $fh, '<:raw', $file;
read $fh, my $all, -s $fh;
close $fh;

my $filesize = -s $file;

my $count;
while ( $all =~ /(BM.{12})/sg ) {
    my $m = $1;
    warn "# ", join(" ", unpack("(H2)*", "$m")), "\n" if $debug;
    #https://en.wikipedia.org/wiki/BMP_file_format
    my ($bm, $size, $res1, $res2, $offset) = unpack "A2 V H4 H4 V", $m;
    if ( $offset > $size or $size > $filesize ) {
        warn "# Skipping false positive at $-[0] (size $size > file size $filesize)\n" if $debug;
        next;
    }

    warn "Found at $-[0]:\n",
          "BM     = $bm\n",
          "size   = $size\n",
          "res1   = $res1\n",
          "res2   = $res2\n",
          "offset = $offset\n" if $debug;

    $count++;
    my $bitmap = substr($all, $-[0], $size);
    print "Saving $file-$count.bmp\n";
    open my $bmfile, '>:raw', "$file-$count.bmp" or die;
    print $bmfile $bitmap;
}

Finally, an alternative which I only found afterwards is to install Lotus SmartSuite 9.8 which can be downloaded from the WinWorld site : https://winworldpc.com/product/lotus-smartsuite/9-8

That will also let you open Ami Pro files and save them in various other formats. One advantage is that when saving to Word 97 .doc files, embedded images are preserved.

Labels: , , , , , ,

Thursday, May 15, 2014

Bootcamp adventures

I needed to replace a drive in a Mac mini with a bigger one. The drive had Mac OS X 10.9 (Mavericks) and Bootcamp with Windows 7. After using Clonezilla to backup the drive and restore it to the bigger one, the partitions were obviously still the same size. There was just a lot of free unpartitioned space at the end of the new drive.

How to resize and move all the partitions (including the hidden EFI and Recovery partitions), to fill the free space?

Disk Utility will not let you touch the Bootcamp partition. Windows 7 looked like it could resize it, but not move it. Resizing it with Win7 created a mess: the Mac would still see the original size.

The heart of the problem seems to be that the Mac wants a GPT partition table, but for Bootcamp, it creates a hybrid MBR partition which is what Win7 sees. Win7 would have no problem with a GPT-only partition, but Bootcamp makes a hybrid MBR anyway. Win7 then resizes that MBR partition, but doesn't update the GPT partition table, which is what the Mac sees. And the Mac doesn't let you fix it either.

At this point, I tried Gparted, but it wouldn't touch this mess (giving some error which I forgot).

Paragon's Camptune X looked like the best solution. However, after paying $20 for it, it turned out it couldn't do anything either. All it does is to let you move a cursor for the relative sizes of the Mac and Windows partitions. But you cannot increase the size to use the free space.

Finally, Rod Smith's Gdisk saved the day again.

What I ended up doing worked in the end:

  • Booted a Gparted USB key, and resized the Windows partition to fill the entire disk.
  • Booted to Mac, and used Camptune X to enlarge the Mac partition while reducing the Windows one.
  • Now, Windows would not boot.
  • Used gdisk to re-create the hybrid MBR, and mark the Windows partition as bootable, as explained in detail in this post.

Labels: , , , , ,

Wednesday, February 15, 2012

WPKG client in Windows 7

Wpkg is a fantastic tool to manage software installs on groups of Windows machines without a Windows server with Active Directory. However, I had a few problems with it in Windows 7. These were solved by replacing the Wpkg Client with Wpkg-GP.

By default, the Wpkg service runs at startup and does it's installs in the background. But very often, it failed for some reason to get a connection to the network share at the right time when the service was starting, and aborted. The log showed

WNetAddConnection2-> The network location can not be reached.

I tried to add dependencies to the service, but didn't really find a reliable solution.

So in services.msc, I changed the service startup to "Automatic (delayed)". That solved the connection problem, but brought another. If I want to upgrade Thunderbird for example, the installer has a taskkill command to close Thunderbird before upgrading it. But with a delayed start, the user probably has already started Thunderbird, and it seems quite inappropriate to just kill it while it may actually be in use.

In Windows XP, it was possible to delay the login window, so that wpkg could have done it's thing before the user logged in, but for some reason, this doesn't work in Windows 7 anymore.

So the next step was to change the configuration in settings.xml to have wpkg run at shutdown instead. This also failed because, as far as I understand, Windows Vista/7 don't allow a process to prevent shutdown for more than 5 seconds.

Finally, the solution was to remove the standard Wpkg Client, and replace it with Wpkg-GP. That seems to work. I changed the wpkg configuration back to running at startup, and added a wpkg-gp package which also takes care of uninstalling the original wpkg client:

<package id="wpkg-gp" name="Wpkg-GP" revision="%version%">

    <variable name="version" value="0.15" />

    <check type="uninstall" condition="versiongreaterorequal" path="Wpkg-GP %version% .*" value="%version%"/>

    <install cmd="%SOFTWARE%\wpkg-gp\Wpkg-GP-0.15_x64.exe /S /INI %SOFTWARE%\wpkg-gp\Wpkg-GP.ini">
        <exit code="3010" reboot="delayed" />
    </install>
    <install cmd='msiexec /x "%SOFTWARE%\wpkg\WPKG Client 1.3.14-x64.msi" /qn /norestart' />

    <upgrade cmd="%SOFTWARE%\wpkg-gp\Wpkg-GP-0.15_x64.exe /S /INI %SOFTWARE%\wpkg-gp\Wpkg-GP.ini">
        <exit code="3010" reboot="delayed" />
    </upgrade>
</package>
 

Labels: , , , , ,

Tuesday, July 26, 2011

Importing root certificates into Firefox and Thunderbird

Update Feb. 2012: see at the end for an alternative for new profiles.

This is ridiculously complicated and makes me wonder whether I should just drop Firefox in Windows and go back to IE.

The problem:

How to automatically pre-import your self-signed certification authority into all user profiles for Firefox and Thunderbird.

The solution:

You need the Mozilla certutil utility (not the Microsoft certutil.exe).

In Windows, you would need to compile nss tools or use some ancient hard to find Windows binary to get it. But all my user profiles are on a Samba server, so it was much easier to do it on the server, with the added benefit of having Bash and not needing to struggle with the horrible cmd.exe.

First install the tools. In Debian, it would be:

apt-get install libnss3-tools

Then adapt this long command to your paths:

find /path/to/users-profiles -name cert8.db -printf "%h\n" | \
while read dir; do \
  certutil -A -n "My Own CA" -t "C,C,C" -d "$dir" -i "/path/to/my_own_cacert.cer"; \
done

(-printf "%h\n" prints just the directory, without the file name, one per line. That is fed to the $dir variable needed in the certutil command. The -n option is a required nickname for the certificate. -t "C,C,C" is what will make you accept any certificate signed by this CA you are importing).

See also: the certutil documentation, and a better explanation of the trust arguments (-t option).

Alternative:

The above solution works to add a certifcate to an existing profile's cert8.db. To have newly created profiles include the certificate, you need to put a good cert8.db file into the Program's directory.

  1. Either import your certificate(s) manually into an existing profile, or use the steps above to add the certificate(s) to a cert8.db file.
  2. Copy the new cert8.db to the Firefox (or Thunderbird) program directory, into a "/defaults/profile" subdirectory. (ie. "C:\Program Files (x86)\Mozilla Firefox\defaults\profile\").

This way, newly created profiles will copy this cert8.db file instead of creating a new one from scratch.

Labels: , , , , , , , , , , , ,

Tuesday, June 07, 2011

Windows installers options for silent installs

Different installers use different command-line options for silent or unattended installs. Since I had started these notes, I have found a good overview on unattended.sourceforge.net.

Inno Setup

can be identified with the "Inno Setup" string appearing in various places in the installer's .exe. The options are described here. The most useful ones are:
  • /SAVEINF="filename"
    Save installation settings to the specified file.
  • /LOADINF="filename"
    Load the settings from the specified file after having checked the command line.
  • /SP-
    Disables the This will install... Do you wish to continue? prompt at the beginning of Setup.
  • /SILENT, /VERYSILENT
    When Setup is silent the wizard and the background window are not displayed but the installation progress window is. When a setup is very silent this installation progress window is not displayed. Everything else is normal so for example error messages during installation are displayed.
  • /DIR="x:\dirname"
  • /LANG=language
    Specifies the language to use. language specifies the internal name of the language as specified in a [Languages] section entry.

Nullsoft's NSIS

can be identified with the "NSIS" string appearing in various places in the installer's .exe. The options are described here, but there seem to be only 2 useful ones:
  • /S
    Silent installation
  • /D=C:\Bla
    Set output folder

Labels: , , , , , ,

Saturday, May 23, 2009

Hard drive partitions and file system essentials

What most normal users need to know about hard disk partitions and filesystems to be able to move hard disks between various operating systems like Mac or Windows.

Hard disks contain 1 or more partitions. To the user, each partition appears as if it were a separate hard disk.

(In Windows, each partition receives a separate drive letter like C:, D:, etc.; on a Mac, you see a separate icon on the desktop for each partition; in Linux, each is a device like /dev/sdb1, /dev/sdb2, etc.)

Every partition needs to be formatted with a file system to let the operating system store and retrieve files. (On Mac, this formatting process is called "erasing")

There are many different types of file systems. Your system needs to understand these file systems to be able to use them. Unfortunately, various operating systems use different file systems. The problem is to find which one will be understood by all the systems you intend to connect your drive to. Also, some systems only support reading some file systems, not writing to them.

Summary

Below is a table trying to summarize the compatibility between the 3 main operating systems and the 4 main file system types. There are many others, but if you know about them, you probably don't need this page.


Windows Mac OS X Linux
FAT32 or DOS

Native support

Max. 4GB. file size

Read/Write

Max. 4GB. file size

Read/Write

Max. 4GB. file size

NTFS Native support

Read only.

Write support through external drivers. 1

Read/Write on recent distributions. 2
HFS+ or "Mac OS extended" Requires third party programs for reading and writing. 3 Native support

Read only.

Write if the journaling feature has been turned off in Mac OS X. 4

Ext2 or Ext3 Free drivers allow Read/Write access.5 Requires commercial driver. 6 Native support
FAT or FAT32 (named "MS-DOS" in Macs)

This the oldest of the file systems commonly used today. As such, it has the greatest compatibility and the least functionality. It is a sort of lowest common denominator.

All operating systems can read and write to it. It is the file system generally used on USB flash drives, memory cards for photo cameras, etc.

It cannot store files greater than 4 Gigabytes. It is also the least reliable of the current file systems, and has many other drawbacks (fragmentation, no support for permission, time stamps in local time and with only 2 seconds resolution, etc.)

The Windows disk manager refuses to format a FAT32 partition greater than 32 GB. But it can be formatted in Windows with the free fat32format.exe utility, or can be formatted to the wanted size on Mac or Linux.

NTFS

Is the native file system of Windows.

Macs can read it, but cannot write to it.

However, there is a Mac version of the open source NTFS-3G driver which can write to NTFS. 1

Recent Linux versions can both read it and write to it (thes usually have this NTFS-3G driver installed by default). 2

HFS aka. "Mac OS X" HFS+ aka. "Mac OS X Extended (journaled)"

Is the native file system on Macs.The Mac default is the HFS+ journaled variant.

Windows needs special programs installed to be able to read or write it. 3

Linux can read it when it has the hfsutils package installed. It can also write to it if journaling has been disabled. 4

Ext2 or Ext3

is the most common file system on Linux.

(If you wonder why you would need to know anything about Linux: while it is not very common as a desktop operating system, it is the system used in almost all your non-computer devices which contain a hard disk, like your NAS backup disk, your media player, etc. If that device breaks, you may be able to recover the files from it's hard disk by connecting it to your main computer and installing the driver for the ext2 file system)

Windows can read and write to it using free drivers. 5

There is a Mac driver, but it may be problematic. 6

Footnotes:

1. Mac -> NTFS : The free and open source ntfs-3g driver for Mac is available on http://sourceforge.net/projects/catacombae/files/. The commercial version is based on the same code, but improves speed. You may also want to have a look at the user guide and the macntfs-3g blog.

2. Linux -> NTFS : In case you have an older distribution which doesn't have it pre-installed, you can normally install "ntfs-3g" using your distribution's package manager. Or have a look at their availability page.

3. Windows -> HFS : If you only need to copy files from a Mac disk to your Windows machine, you can use the free HFSExplorer, which will open your drive in a Windows Explorer-like window and let you copy files from there.

For full support, you may need commercial software like MacDrive or similar.

4. Linux -> HFS : If it isn't already on your system, you will need to install the "hfsutils" package.

If you need to write to the HFS disk, journaling must be disabled. You need to do this on a Mac. Afterwards, you can re-enable journaling (again on a Mac). To disable journaling on a Mac, open Disk Utility, select the volume, hold the Option (or Alt) key while opening the File menu, which will make the "Disable Journal" menu entry appear in the menu. Alternatively, you can enter diskutil disableJournal "/Volumes/YOUR_VOLUME_NAME" in Terminal

5. Windows -> ext2/3 : There are 2 free drivers. The open source one is at http://www.ext2fsd.com/ and the closed source one is at http://www.fs-driver.org/.

6. Mac -> Ext2/3 : You can try the commercial ExtFS for Mac OS X. Or the open source fuse-ext2 which I have never tried. (There is also another free open source driver (http://sourceforge.net/projects/ext2fsx), but that project doesn't seem to be actively maintained. It may have worked well on older Mac OS versions, but when I tried a simple folder move with the current version 1.4d4 on a Mac OS X 10.5 system, it made the system crash hard, and left a badly corrupted drive, which I had to repair using e2fsck on Linux.)

Labels: , , , , ,

Sunday, January 11, 2009

try windows 7 beta

So we can try this Windows 7 beta now, which is said to be better than Vista, and which we'll have to get used to anyway. Here a few tips which I may need when I find a machine to try it on, and which may help you too.

The official download seems to only work with IE 7, but if you get the direct link it does work normally. So with wget, that would be:

For the 32 bit version:
wget -c http://download.microsoft.com/download/6/3/3/633118BD-6C3D-45A4-B985-F0FDFFE1B021/EN/7000.0.081212-1400_client_en-us_Ultimate-GB1CULFRE_EN_DVD.ISO
And for the 64 bit version:
wget -c http://download.microsoft.com/download/6/3/3/633118BD-6C3D-45A4-B985-F0FDFFE1B021/EN/7000.0.081212-1400_client_en-us_Ultimate-GB1CULXFRE_EN_DVD.ISO

To have the beta working until August, you need a key. Apparently, there are only a few keys used:

7XRCQ-RPY28-YY9P8-R6HD8-84GH3
RFFTV-J6K7W-MHBQJ-XYMMJ-Q8DCH
482XP-6J9WR-4JXT3-VBPP6-FQF4M
D9RHV-JG8XC-C77H2-3YF6D-RYRJ9
JYDV8-H8VXG-74RPT-6BJPB-X42V4

4HJRK-X6Q28-HWRFY-WDYHJ-K8HDH
QXV7B-K78W2-QGPR6-9FWH9-KGMM7
6JKV2-QPB8H-RQ893-FW7TM-PBJ73
GG4MQ-MGK72-HVXFW-KHCRF-KW6KY
TQ32R-WFBDM-GFHD2-QGVMH-3P9GC

Possibly also useful:

Labels: , , , , ,

Saturday, December 13, 2008

A propos d'antivirus

Hier soir, en passant sur un site web, j'ai attrapé un ou des virus/malware ou autre, et j'ai stupidement perdu des heures pour m'en débarrasser au lieu d'aller me coucher et de résoudre le problème en 10 minutes le lendemain.

Résumé des enseignements de la mésaventure:
  • Ne pas oublier que Linux permet de facilement effacer/renommer des fichiers que Windows ne peut pas. J'ai bêtement commencé par des recherches web qui menaient tous à des forums suggérant l'nstallation d'utilitaires comme MoveOnReboot ou autres. Outre que le programme a lamentablement échoué dans sa tâche, il y a l'absurdité d'installer un nouveau programme pour juste effacer quelques fichiers. De plus, comment savoir que celui-là est OK, parmi l'avalanche de pop-ups causés par l'infection (qui me proposent tous d'installer des pseudo-antivirus gratuits depuis leurs généreux sites web infestés de malware).
  • Ne pas oublier la recherche de fichiers par date et heure. Une fois qu'on a l'un des fichiers coupables, ça permet facilement de retrouver tous les autres. Total Commander a ça dans la page "Advanced" de sa fenêtre de recherche (Alt-F7).
  • Actuellement, parmi les antivirus gratuits que j'avais, Avira Antivir est celui qui a le mieux reconnu le problème (sans pouvoir le résoudre). Il est le plus énervant avec son pop-up géant et quotidien, mais au moins, il voit les virus. (Ceux qui ont été inutiles étaient Moon Antivirus qui ne voyait rien, ClamWin qui ne voyait pas grand chose et qui est d'une lenteur incroyable, et Avast qui ne voyait rien, peut-être parce qu'il ne met plus à jour ses définitions depuis 2-3 mois, parce que je n'ai pas renouvelé la clé d'enregistrement)
  • Au lieu de l'habituel Run (HKLM\SOFTWARE\Microsoft\Windows\CurrentVersion\Run\), les virus actuels tendent à se cacher dans le mécanisme de Winlogon de Windows (HKLM\SOFTWARE\Microsoft\Windows NT\CurrentVersion\Winlogon\Notify\).
  • StartupMonitor est vraiment indispensable. C'est lui qui m'a immédiatement fait réaliser qu'il y avait un problème. (Dommage que ni lui ni son compagnon StartupCPL n'incluent Notify dans les parties de "registry" qu'ils gèrent)
Bref, la procédure rapide et efficace est:
  1. Examiner Run et Notify pour identifier les suspects.
  2. Examiner les dates et heure de création des fichiers suspects pour identifier les vrais coupables, puis rechercher d'autres fichiers avec ces dates et heures.
  3. Démarrer Linux pour effacer ou renommer les coupables
  4. De retour dans Windows, nettoyer le registry.
Hélas, dans 6 mois ça ne suffira sans doute plus. Il y aura des virus plus malins...

Mise à jour: un ami me fait remarquer que les vendeurs d'antivirus proposent des CD bootables dont il y a un rapport de test ici (le meilleur semble être celui de Kaspersky pour le moment). Si on n'a pas déjà un LiveCD Linux comme Knoppix ou Ubuntu, ou si on ne sait pas exactement quels fichiers il faut effacer, c'est sûrement la solution la plus simple.

Labels: , , , ,

Sunday, July 06, 2008

Remote support through NAT firewalls

Remote support with tools like Remote Desktop, (Tight|Real|Ultra)VNC servers and clients etc. normally requires forwarding ports through NAT routers/firewalls on one side or the other.

In practice, this doesn't quite work: guiding the remote user over the phone to configure his router is unrealistic. He probably doesn't even know his router's password.

An alternative is to use reverse connections, so you deal with the port forwarding on your own router. But this doesn't work either if you are away from home and connect through someone else's router.

There are services which allow you to use someone else's server in the middle of the connection. But these services are usually expensive, charging a monthly fee, and besides you may not want the data to go through some third party's server for security reasons.

One nice solution I found for Windows is to use UltraVNC Single Click, and to run an UltraVNC repeater on my own server. The principle is shown here.

(I'm still looking for an equivalent solution to connect to remote Macs, so if you have suggestions, please post a comment).

So if you have a server with a public IP address you can do this to support Windows users.

Install a repeater on your server:

For my Debian Linux server, I installed the Linux version of the UltraVNC repeater from here:
http://koti.mbnet.fi/jtko/uvncrepeater/repeater014.zip.

After unzipping and moving into the directory, compilation was trouble free with a simple make.

The rest consisted of the following steps (which were quickly adapted from this post, and could probably be improved):
  • Create a new user: adduser uvncrep (with the shell set to /bin/false)
  • Edit the .ini file to produce a /etc/uvncrepeater.ini resembling this (use your server's IP for the "ownipaddress" value, and any numbers you like for the "idlistx" values).
    [general]
    viewerport = 5900
    serverport = 5500
    ownipaddress = aaa.bbb.ccc.ddd
    maxsessions = 10
    runasuser = uvncrep
    allowedmodes = 2
    logginglevel = 3

    [mode2]
    requirelistedid = 0
    idlist0 = 1800
    idlist1 = 1801
    idlist2 = 1803

    [eventinterface]
    useeventinterface = false
  • Copy the repeater executable to /usr/local/sbin/uvncrepeaterd
  • Create /etc/init.d/uvncrepeater:
    #!/bin/sh

    PATH=/sbin:/bin
    UVNCREPPID=/var/run/uvncrepeater.pid
    UVNCREPLOG=/var/log/uvncrepeater.log
    UVNCREPRUN=/usr/local/sbin/uvncrepeater-log
    UVNCREPSVC=/usr/local/sbin/uvncrepeaterd
    UVNCREPINI=/etc/uvncrepeater.ini

    #if service file does not exist then exit the script

    if test ! -x $UVNCREPSVC ; then
    echo $UVNCREPSVC file was not found.
    echo Exiting...
    exit 2
    fi

    #Create the file to start the service if it does not exist

    if test ! -x $UVNCREPRUN ; then
    echo '#!/bin/sh' > $UVNCREPRUN
    echo 'exec' $UVNCREPSVC $UVNCREPINI '2>>' $UVNCREPLOG >> $UVNCREPRUN
    chmod +x $UVNCREPRUN
    fi

    case "$1" in
    start)
    echo -n "Running UltraVNC Repeater..."
    start-stop-daemon --start -b -m -p $UVNCREPPID --exec $UVNCREPRUN -- $UVNCREPLOG
    echo "."
    ;;
    stop)
    echo "Stopping UltraVNC Repeater..."
    start-stop-daemon --stop -p $UVNCREPPID
    rm $UVNCREPPID
    ;;
    *)
    echo "Usage: $0 {start|stop}"
    exit 1
    esac
    exit 0
  • Start the daemon with /etc/init.d/uvncrepeater start

Configure the Single Click executable

This is the small executable which your clients will download and run so that you can access their computer.

You can follow the instructions here.

For the helpdesk.txt file, you can use the one provided in custom.zip. However, it is a bit messy, and has a few typos/spelling mistakes. If you prefer, you can try this alternative template or this sample file instead. Both will need editing, particularly to set your server's hostname and one of the IDs you configured on the server .

Then set up a page from which your clients can download the SC executable.

Set up the UltraVNC viewer

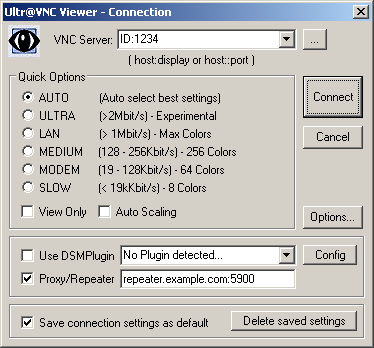
After installing UltraVNC on your machine, start the viewer, and configure it like this:

VNC Server: ID:xxxx (where xxxx is the id number used in your repeater .ini file and when creating the SC executable). "ID" must be in uppercase, and there must be no space in the whole field.

Check Proxy/Repeater and enter your repeater's name or IP and port. For example:
repeater.example.com:5900

UltraVNC Viewer settings

Notes:

As far as I can tell, VNC Reflector looks like it would provide the same functionality as the repeater. I haven't tried it.

To support Vista users, there are some difficulties. Apparently there may be solutions in this lengthy thread, but I haven't tried them yet. (Fortunately, I have been able to mostly avoid Vista until now.)

And, as mentioned at the beginning, I would be glad to find a solution to support Mac users from my Windows box through my repeater.

Labels: , , , ,

Friday, May 16, 2008

Windows ip config with batch scripts

It is possible to configure TCP/IP with simple batch scripts in Windows XP, even though the information is well hidden. There are a few typical Windows annoyances attached, but for a notebook user who needs to change settings often, double-clicking a batch file is definitely much better than the network configuration GUI.

The almost secret - even though it is included in the default XP install - tool is called netsh.

Below are a few examples. The main idiosyncrasy is that you need the name of the interface to configure, and that name is somewhat unpredictable. In particular, it is localized. For the normal Ethernet interface, in an English system, it starts with "Local Area Connection". But it is different in other language versions of Windows. There is no simple standard name like "eth0" or "en0".

Look up your interface names in "Network Connections", or by typing ipconfig or
netsh interface show interface
at the command prompt.

A simple batch file which will set your LAN interface to DHCP:
SET LAN=Local Area Connection

netsh interface ip set address name="%LAN%" source=dhcp
netsh interface ip set dns name="%LAN%" source=dhcp register=NONE
netsh interface ip set wins name="%LAN%" source=dhcp

This one will set it to a fixed IP address:
SET LAN=Local Area Connection

SET IP=192.168.1.56
SET MASK=255.255.255.0

SET GW=192.168.1.1
SET DNS=%GW%

netsh interface ip set address name="%LAN%" source=static addr=%IP% mask=%MASK%
netsh interface ip set address name="%LAN%" gateway=%GW% gwmetric=0
netsh interface ip set dns name="%LAN%" source=static addr=%DNS% register=NONE

Finally, a more complete example, which sets both the LAN and WIFI interfaces can take an optional second DNS server, and set the WINS server:
SET LAN=Local Area Connection 5
SET WIFI=Wireless

SET IPLAN=192.168.1.56
SET MASKLAN=255.255.255.0

SET IPWIFI=192.168.1.57
SET MASKWIFI=255.255.255.0

SET GW=192.168.1.1
SET DNS=192.168.1.1
SET DNS2=
SET WINS=none

netsh interface ip set address name="%LAN%" source=static addr=%IPLAN% mask=%MASKLAN%
netsh interface ip set address name="%LAN%" gateway=%GW% gwmetric=0
netsh interface ip set dns name="%LAN%" source=static addr=%DNS% register=NONE
IF NOT "%DNS2%" == "" netsh interface ip add dns name="%LAN%" addr=%DNS2% index=2
netsh interface ip set wins name="%LAN%" source=static addr=%WINS%

netsh interface ip set address name="%WIFI%" source=static addr=%IPWIFI% mask=%MASKWIFI%
netsh interface ip set address name="%WIFI%" gateway=%GW% gwmetric=0
netsh interface ip set dns name="%WIFI%" source=static addr=%DNS% register=NONE
IF NOT "%DNS2%" == "" netsh interface ip add dns name="%WIFI%" addr=%DNS2% index=2
netsh interface ip set wins name="%WIFI%" source=static addr=none
netsh interface ip set wins name="%WIFI%" source=static addr=%WINS%


You can also use netsh to configure the Windows firewall, check network connectivity, etc.

As a ping replacement, try this:
netsh diag ping adapter 1
(replace "1" with your network adapter's index number, which you can find with netsh diag show adapter). It will automatically ping your gateway, your DNS server(s) and your own IP address.

For more information, try these links:
How can I configure TCP/IP settings from the Command Prompt?
or
10 things you should know about the NETSH tool
or just do a web search on "netsh".

Labels: , , , , ,

Saturday, April 26, 2008

System hive too large with 32 bit XP and 3GB switch

When using the /3GB switch with 32 bit Windows XP, you can easily hit a 12 (or 10.4?) MB limit for the system registry hive. This is the size of your C:\Windows\System32\config\SYSTEM file.

Symptoms include errors like Windows cannot start new hardware devices because the system hive is too large (exceeds the Registry Size Limit). (Code 49), and can get as bad as a STOP error when trying to boot the system with the /3GB switch.

To reduce the size of this registry hive, you can:

Run a registry optimizer like Lars Hederer's free NTREGOPT.

This will defragment the registry and save some space.

While there, also get his registry backup and restore program ERUNT ("Emergency Recovery Utility NT"). Run that regularly, and consider making him a donation for his fine utilties.

If that is not enough, you need to

Remove references in the registry to hardware you no longer use.

Usually, this is mostly external drives and USB flash drives which are no longer connected to the system. These can be removed automatically with the Veritas VxScrub program. Just run
Vxscrub -p
and reboot.

If you would like to also remove refenrences to unused printers, mice, keyboards and other stuff, you need to do it manually in the Device Manager, deleting devices one by one.

To make Device Manager display all the devices in the registry instead of only the currently connected devices, you need to run this in a command prompt window (or put both lines into a batch file which you could name ShowAllDevices.bat:
set DEVMGR_SHOW_DETAILS=1
set DEVMGR_SHOW_NONPRESENT_DEVICES=1
start devmgmt.msc
Then in Device Manager, you need to select View -> Show hidden devices. They will appear in a lighter color.

After deleting what you don't need, reboot and run NTREGOPT (which will have you reboot again).

A note about NTREGOPT:
It is not a very polite utility in a multitasking environment. It will tend to completely freeze your system, and it's progress bars are not very informative either (they only move when going from one registry hive to the next). The software and system hive optimization can easily take many minutes, during which you can do nothing on the system except watching a progress window which seems caught in an endless loop. Don't worry and be patient. The utility does work fine.

Labels: , , , ,

Wednesday, January 16, 2008

Simple password management

To easily manage all your passwords, you don't need any freeware/shareware/crapware/malware/whateverware. If you are running Windows, all you need is 2 batch files, each containing a single line.

As a bonus, you can get some very simple security-through-obscurity by using a little known feature of the NTFS file system called "Alternate Data Streams". The security is not great, but the obscurity feels like a cool hack. And it's still better than having passwords.txt on your desktop, or Post-its on your monitor. (Of course, you can also skip the coolness and combine these handy batch files with the excellent TrueCrypt for really strong encryption at the expense of a minimum of additional hassle).

  1. Create a file containing anything (or nothing). Let's call it x, and put it in our profile folder (C:\Documents adn Settings\username\)
  2. Create a batch file (let's call it password-add.bat) with one line:
    @ECHO %* >> "%USERPROFILE%\x:passwords"
  3. Create a second batch file (for example password.bat) also with one line :
    @FIND /I "%1" < "%USERPROFILE%\x:passwords"
  4. Copy these two files to some directory in your path (like C:\Windows or C:\Windows\System32)
To add your new Google user name and password, open a Command Prompt window, and type:

password-add "Google: mystupidname@gmail.com pass: ul7ra-secr37"

To retrieve that password once you have forgotten it, type anything like

password Google
or
password stupid
or
password @gmail.com
etc.

To add some obscurity, call the batch files something else (and shorter so you don't have to type so much): like newp.bat and p.bat.

To add even more obscurity, copy some small .dll file in c:\Windows\System32 to a new name like msp32.dll, and in the batch files replace "%USERPROFILE%\x:passwords" with "c:\Windows\System32\msp32.dll".

To add real security, get TrueCrypt, and put the file on a TrueCrypt volume. (Don't forget to correct the 2 batch files).

Important: This only works on NTFS partitions. If you move your file to a FAT32 partition or send it by email or FTP, all your passwords are lost forever. If your backups are done to an external FAT32 disk, you won't have a backup either. You can move the file around as much as want, providing that it always stays on NTFS partitions. If you copy over a network, the server also needs to be Windows (not Samba).

Labels: , , , , , , ,

Monday, February 05, 2007

Linux desktop GUI in Windows

Just discovered a fantastic tool to allow remote access to a Linux GUI desktop from my Windows notebok: NoMachine's free NX Server.

While setting up a new server, after the initial basic install, I needed a way to compare the /etc trees of the old and new servers. There are over 500 file differences, so diff with it's unreadable output was not well suited to the task. At least, not by itself. The ideal tool would of course have been Total Commander's fantastic "Synchronize Dirs" command and it's built-in file comparison, but unfortunately that's only for Windows. The indispensable Linux Midnight Commander does have a directory comparison, but it doesn't go into subdirectories, nor does it compare files. Apparently, I needed something like Kompare, Meld or Kdiff3, which are all GUI programs, to get usable directory comparison. So I would have to install KDE or Gnome on a Linux server. That had always seemed pretty weird to me: why install a GUI on a machine which will have no keyboard or screen. Well, the times have changed, and you can now use KDE running on a remote server in some anonymous rack in a data center from your remote Windows machine. (BTW, Meld ended up being my preferred GUI diff tool).

I had first seen NX Server in a menu in Knoppix 5.1. I couldn't get it to work, but it had intrigued me. After spending far too much time struggling to try to get the open source version FreeNX to work on my new Debian Sarge server, I eventually came across this post which suggests just installing the NoMachine version. 10 minutes later, I had KDE running on my Windows notebook! The free NoMachine version is limited to 2 concurrent users, but that is one too many for me anyway.

While I'm still setting that server up, it's in an office with an ADSL link, and a very slow 100 kb/s. upstream speed. Still, I could connect to it from home, and use KDE as if I was sitting in front of the machine. It is orders of magnitude faster than VNC, which I sometimes use to access Windows machines over much faster links.

This technology also opens the door to the use of Linux in Windows offices. While it would be unrealistic to try to migrate most small businesses I know to Linux, it is now possible to add Linux applications running on the server to Windows users.We can now have the best of both worlds.

Download:

NX Client DEB for Linux

NX Node DEB for Linux

NX Desktop Server DEB for Linux

(You have to click a little through these pages to get to the real download link which you can use with wget)

Update: They seem to have grouped these 3 deb files onto the NX Free Edition for Linux page.

Install: (The order is important!)

# dpkg -i nxclient*.deb

# dpkg -i nxnode*.deb

# dpkg -i nxserver*.deb

Before I could install nxclient, I had to aptitude install libaudiofile0.

The server needs to connect to the ssh daemon. I use a non standard port, so I also had to

# perl -i.bak -pe 's/^[#\s]*(SSHDPort|SSHDAuthPort)\s*=.*/$1="MYOTHERPORT"/' /usr/NX/etc/node.cfg

# perl -i.bak -pe 's/^[#\s]*(SSHDPort|SSHDAuthPort)\s*=.*/$1="MYOTHERPORT"/' /usr/NX/etc/server.cfg

If you use AllowUsers in your /etc/ssh/sshd_config file, you need to add the nx user to that line:

# perl -i.bak -pe 's/^[#\s]*(AllowUsers\s*.*)/$1 nx/' /etc/ssh/sshd_config

If you get the error "cannot run startkde" or "cannot start gnome-session", you may need to  aptitude install ksmserver or the equivalent for gnome.


Labels: , , , , , ,

Friday, September 01, 2006

Multimedia playback in browser

A few links to check media players in browsers after install. I will try to keep this list updated, since I need it often, after fresh OS installs. and a few others: For Firefox, you can find links to many plugins on the Add-ons page, in the plugins category. However, these are just links to the Adobe/Apple/Real websites to download their installers.

Labels: , , , , , ,

Saturday, April 23, 2005

Cloning XP with Linux and ntfsclone

I recently had two different occasions where I wanted to clone Windows XP on a few identical machines. The first time, I cloned the entire disk, bit by bit, using the dd and netcat method described in a previous post. That worked very well, but was very slow: several hours for a little 40 GB disk over a Gigabit link.

This time, I had 80 GB disks, and I not only wanted to clone the machine, but also to keep the image as a backup. So I wanted a method which would not blindly copy the whole disk, but only the parts of it that are really in use.

The partitions being NTFS, I tried ntfsclone. After falling into a few traps (completely unrelated to ntfsclone itself), it worked perfectly, and was pretty fast (using Gigabit Ethernet). So here is the recipe, for myself when I will need it again, and for whoever may find it useful:

Ingredients:

  • The machine to clone which I will boringly call Master.
  • The new clone, unsurprisingly called Slave here, and which is assumed to be made of identical hardware, particularly the hard disk.
  • Gigabit Ethernet.
  • A server for the Master disk image
  • A Linux "Live CD" (I used Knoppix 3.8.1, which had ntfsclone version 1.9.4).

The Backup:

Boot Master from the Linux live CD

Open a root shell

Set my swiss keyboard layout if needed
# setxkbmap fr_CH
or in newer versions:
# setxkbmap ch fr or setxkbmap ch de


Check if the network is up
# ifconfig eth0

It wasn't for me, and DHCP tended to fail for some reason, so I configured it manually:

# ifconfig eth0 192.168.1.27
# echo nameserver 192.168.1.4 > /etc/resolv.conf
# echo search example.lan >> /etc/resolv.conf
# route add -net 0.0.0.0 gw 192.168.1.100

The machine displaying a stupid time and time zone, I also did
# tzselect
and pasted the string it suggested on the command line,
# TZ='Europe/Zurich'; export TZ
and then set the clock:
# ntpdate pool.ntp.org
# hwclock --systohc

This was not really necessary, but I noticed that the file times on the server would be wrong if the client had a wrong time and/or time zone.

And now the real stuff:

Create a mount point
# mkdir /tmp/server

Mount the server's share. I used a share called diskimages on a Samba server, but it could have been Windows, an NFS server, or whatever.
# mount -t smbfs -o username=my_user_name   //server_name/diskimages /tmp/server

Check how your live CD called the partitions you want to save
# cat /proc/partitions
major minor #blocks name

8 0 78150744 sda
8 1 20482843 sda1
8 2 1 sda2
8 5 20482843 sda5
8 6 37182411 sda6
180 0 253952 uba
180 1 253936 uba1
240 0 1939136 cloop0

I want to save that 80 GB disk sda, which has a primary partition sda1,
and an extended partition sda2 containing logical partitions sda5 and
sda6. So what I want to save is sda1, sda5 and sda6.
First I saved the partition table and the Master Boot Record
# sfdisk -d /dev/sda >/tmp/server/master-sfdisk-sda.dump
# dd if=/dev/sda bs=512 count=1 of=/tmp/server/master-sda.mbr

and then the partitions:
ntfsclone -s -o - /dev/sda1   | gzip | split -b 1000m - /tmp/server/master-sda1.img.gz_
ntfsclone -s -o - /dev/sda5 | gzip | split -b 1000m - /tmp/server/master-sda5.img.gz_
ntfsclone -s -o - /dev/sda6 | gzip | split -b 1000m - /tmp/server/master-sda6.img.gz_
This is where I fell into the first trap. My Samba server doesn't seem to accept files larger than 2 GBytes! That is why the output is piped through split. I still don't know why I cannot write files larger than 2 GB, and if you do, please let me know. This is a Samba 3.x server running on Debian with a 2.6.x kernel, and the share is on a 36GB ext3 partition.
(update: this comment suggests to add the lfs option to smbfs mount. This allowed me to write more than 2 GB, but not more than 4GB. Probably because it's a FAT32 partition)

Anyway, split solved that problem nicely, chopping the output into 1 GB files, but I had added gzip in the hope of making things faster, and that gzip and split combination bit me later. And I'm not even sure that the gzip overhead is worth the bandwidth saving. Gigabit Ethernet can be really fast. In fact, it can be faster than the hard disks. That may be worth benchmarking some time. (I also tried bzip2, which has better compression, but that was excruciatingly slow).

That's it for the backup. Now, to the next part:

The Restore:

Boot Master from the Linux live CD, and proceed as for the backup:

setxkbmap fr_CH
ifconfig eth0 192.168.1.27
echo nameserver 192.168.1.4 > /etc/resolv.conf
echo search example.lan >> /etc/resolv.conf
route add -net 0.0.0.0 gw 192.168.1.100
TZ='Europe/Zurich'; export TZ


ntpdate pool.ntp.org
hwclock --systohc

mkdir /tmp/server
mount -t smbfs -o username=my_user_name //server_name/diskimages /tmp/server
(I just copied/pasted this whole block into the shell)

Check your partitions again, and make sure you will not overwrite some other disk!

# cat /proc/partitions

Now I first restored the partition table and the master boot record

# sfdisk /dev/sda < /tmp/server/master-sfdisk-sda.dump
# dd if=/tmp/server/master-sda.mbr of=/dev/sda

And then the partitions. Since I had several files produced by split for my primary partition, I needed to take them all, in the right order of course. split adds "aa", "ab", "ac", etc. to the end of the file name.

# ls -l /tmp/server

will help you check which files you need

This is where the second trap got me. gunzip's documentation led to believe that I could do something like gunzip -c file1 file2 file3 | ntfsclone ... which would be the same as cat file1 file2 file3 | gunzip -c | ntfsclone ...

Well, it is not the same, and my first tries would result in the process aborting after a (long) while, with the error "gunzip: unexpected end of file".

Eventually, it worked:
cd /tmp/server
cat master-sda1.img.gz_aa master-sda1.img.gz_ab master-sda1.img.gz_ac | gunzip -c | ntfsclone --restore-image --overwrite /dev/sda1 -
cat master-sda5.img.gz_aa | gunzip -c | ntfsclone --restore-image --overwrite /dev/sda5 -
cat master-sda6.img.gz_aa | gunzip -c | ntfsclone --restore-image --overwrite /dev/sda6 -
Reboot into your new Windows XP clone.

Now I wonder if there is anything I overlooked with machine IDs (SID?) and such, but I haven't seen a problem so far.
Do I need to do something, to change the SID of the clone?

If you don't need to save the image and want to be faster, you could of course combine this method with netcat and skip the server.

Labels: , , , ,